Friday, February 25, 2011

Meet Our Quality Control Department


My husband's coworkers took us out to lunch today to celebrate Baby Z's arrival and proceeded to shower us with gifts. I am beyond touched by their generosity.

Naturally, we rushed home to test the products out on Mia. Why Mia you ask? She's the perfect size: her body type is the closest to a baby body (albeit a bit more elongated). The other two are way too big and Batman is too frail and thin (and there's that occasional biting too). 

Alas, it seems Mia needs to reevaluate her position as Quality Control Supervisor. She was not entirely thrilled with the diaper trials. Is she even aware of all the testing that needs to be done after the baby shower?


And before you judge: yes, we are going to wash the diaper before putting it on the child. 


Update: It has since been pointed out to us that the diaper is on backwards. Needless to say, we now feel completely prepared for this kid.

Monday, February 21, 2011

The Reading Nook Improves


After adding the shelves in the nursery's reading nook, I realized the wall still lacked a certain "je ne sais quoi". See how bare the wall above the books seems? 


I thought I could add a splash of color on the wall like John & Sherry of Young House Love did with their clothespin wall art

I found these cute phonic flash cards in the dollar bin at Target and knew they would be perfect. 


I knew I wasn't going to use all of the flash cards so I set aside the ones that matched the fabric we're using throughout the nursery (like we did on the rocking chair). 


To hang the flash cards, I wanted to use colored twine. But after visiting several stores, I failed to find any colored twine. Is it just me? Or is this stuff hard to find? I ended up settling for regular twine, but I didn't think it would look nice with the blue walls. 


I used some food coloring to dye the twine. I put about 1/2 a cup of water into a small bowl and added a couple drops of food coloring. Then it was just a matter of adding a piece of twine and letting it soak for a couple minutes (make sure you do this in your sink, it can get pretty messy). 

I tried out some green:


Then some blue:


And finally some yellow: 


Once the pieces of twine were dyed, I hung them out in the garage to dry overnight.


The green turned out way too dark and the blue looked faded. Yellow was the winner. 

Next, it was time to work on the clothespins. Plain clothespins just wouldn't cut it, so I decided to cover them up with some scrap paper. I used the remaining scrap paper from the nursery wall letters and the nursery button art.


I traced a clothespin on the back of a piece of scrap paper and cut it out.


Then I used that piece of scrap paper to cut out more strips. I cut out about 36 strips, enough to cover 18 clothespins on both sides. 


I applied some Mod Podge on the side of a clothespin and then glued the piece of scrap paper on it.


Then I applied some Mod Podge on top of the scrap paper. Once that dried, I flipped the clothespin over and did the same to the other side. 


I did the same for all 18 clothespins.


To hang the twine, I bought two white hooks at Home Depot. We hung them right above the book racks. 


Attaching the twine was a little tricky. I played around with the length until I was satisfied, but it took a couple attempts. 


Then it was as simple as attaching the flash cards to the twine with the clothespins. 


I think it adds just the right amount of color and fun to the reading nook.


Best of all, it was super cheap and easy to do:

Clothespins: $2
Scrap Paper: Already had
Phonic Cards: $1
Twine: $3
Dye: Already had
Mod Podge: Already had

An awesome addition to the nursery for under $10! Gotta love it!

Sunday, February 20, 2011

I'm in love...

With the new Alphabet poster for Baby Z's nursery.


It's so unbelievably perfect for the nursery. A very dear friend got it for us :) I can't even describe how happy it makes me to see it up on the wall. 


Not only is it educational, but it has a robot and an owl. I die. 

Alphabet prints are huge right now. Ohdeedoh has a couple great roundups here, here, and here as well. For the adventurous types, they even have a post on DIY ABC posters

Saturday, February 19, 2011

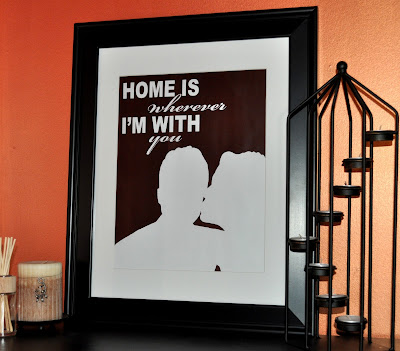
DIY Silhouette Art

Wanted to share the Valentine's Day present I gave my husband this year:


I was inspired by several silhouette prints I had seen on Etsy and thought I'd give it a go myself. I used this tutorial to create the silhouette in Photoshop. It's a great tutorial: really easy to follow for an amateur like myself. Once I created the silhouette, I pasted it on a colored square and added the writing. I was pretty happy with the results.

Just to give you an idea, this is the picture I used for the silhouette:


This one was a bit tough to work with. The more defined space you have between people and objects, the easier it is to make the silhouette.

I still haven't figured out where to hang/put it. Right now it's chillin' on top of one of the dressers. I was going to hang it on the wall but I think I like it layered with other objects like it is right now. The color isn't perfect, but we're planning on painting the walls a darker red anyway.


I'm really happy with the way it turned out. I might make some more fun prints for the hallway eventually. I think the husband liked it too. But just in case, he also got some Red Wings tickets :)

Who's my little lovebug?


I'm not torturing him - this is training. Once Baby Z can walk you bet your buttcheeks she'll try to put the dogs in doll clothes. Sue's just the only one that won't bite back right now. 


PS - I had to Google "buttcheeks" because I wasn't sure if it was one word or two. Turns out it's slang. Check out the second search result. 

Saturday, February 5, 2011

DIY Nursery Button Art


This is the second project for Baby Z's wall mural, to go with the wall letters. Although these are fairly simple, I think they turned out pretty cute for less than $10. 

You'll need:

- Old frames
- Spray paint
- Scrapbook paper (1-2 sheets depending on the size of the frames)
- Mod Podge
- Scissors 
- Cardboard (hopefully the frames come with some cardboard that you can use)
- Buttons (different colors and sizes)
- Glue gun

Start by spray painting the old frames.


If necessary, cut the cardboard to fit inside the frames. Flip the scrapbook paper over and trace the cardboard. Cut the scrapbook paper to fit evenly over the cardboard.


Apply a very thin layer of Mod Podge on the cardboard. Place the scrapbook paper over the cardboard so that it adheres. Let it dry for about 10 minutes. Don't worry if it doesn't stick everywhere, that will fix itself.


Apply a thin layer of Mod Podge over the scrapbook paper and let it dry for 10 minutes. Repeat this step 3 more times. 


Place the pieces of cardboard into the frames, without the glass. 


Take a couple minutes to arrange the buttons on each piece of cardboard until you have a design that you are happy with. Using your glue gun, attach the buttons to the cardboard one button at a time. 

Nursery Progress

Finally got the shelves up in the reading nook: 


Got this great idea from a post on Ohdeedoh. You take these $4 Ikea spice racks and paint them any color you want.


It's not only an affordable alternative to a book shelf, but it also adds some forward-facing shelving for the bambina.

I'm not sure if we're keeping our contractor though. He had a weird moment with the wall: 


Do you recall The Great Rug Debate? We're happy to announce that Option #3 worked out very well!


Look how similar that looks to our Photoshopped version:


 Even the cow was a fan of the rug. She's all "This is nice. You gonna rub my tummy now?"


We got a crib mattress (finally). The cow also helped us test that out. 


Somehow I think she'll remember that next time she chooses to take a dump in the house.

And since I got bored waiting on the contractor, dog photos ensued. But who doesn't love dog photos?

Spice It Up

I had to share this awesome find from Woot!


Your eyes aren't deceiving you. That's a rack with 30 different types of spices for only $30 (that includes shipping folks). This makes my obsessive stalking of the Woot! site a little more justified. I've been looking for a while for a way to store my spices on the counter without taking up too much baking space. This bad boy is only 3.78" deep (that's what she said!) and lets me pretend that I wasn't so crappy at chemistry and eventually became a respected scientist. Sold!

Friday, February 4, 2011

"Oh SNOW you di’int!"


The great Snowpocalypse of 2011 (or as we like to call it: SNOW way out). Seriously overrated.


I mean, don't get me wrong: I still didn't step foot outside (totally took these pictures at the window). But, if you're going to call it a blizzard and make me paranoid enough that I go grocery shopping the night before for fear that I may have to eat my dogs if I get stuck inside long enough, then at least bring on a decent amount of snow. I'm talking 80's movie scene where the sassy protagonist opens the front door and just gets pummeled by a comedic amount of snow - as long as it happened to Chris and not me. I'm just bitter that there wasn't enough snow to warrant a weeklong hibernation but there was enough snow for someone to oppose driving to the store to get me some Sierra Mist and pie.